This tutorial can be applied to ANY diaper pattern. I am showing it on my newest pattern the Rocket Bottoms Totally Squared OS diaper.
This is a GREAT way to make super cute diapers and use up your adorable cotton woven or knit prints.
This tutorial shows a pocket diaper but it can be applied to an AIO, a cover, an AI2 or a pocket.
You are going to start by getting your pattern ready. Decide on your closure style, snaps or hook and loop and get all your supplies ready per pattern instructions.
You will need PUL for a hidden layer, a wicking fabric for the inner layer, a cotton woven or knit for the outer and PUL scraps for the legs and for backing your snaps and or loop on the tummy.
Trace off a full layer of PUL, a full inner layer and a layer out of your cotton woven or knit print.
Set your outer and inner layers aside for the moment. We are going to work on the cotton layer.
Take your cotton and fold it in half. Start at one end of the leg curve and measure in 1 inch from the end.


At the other end of the leg curve measure in one in from the end. Redraw the leg curve starting at one mark, meeting at the center mark and tapering off to the second mark.

Cut out along new leg curve line.
Place cotton woven (still folded in half) on scrap of PUL.
Trace the new leg curve onto the PUL scrap. Draw a line about an inch away from that. Remove the cotton woven and draw another line about and inch away from the leg curve. Be sure to follow the curve as you draw.


Cut out two of these curved leg pieces.
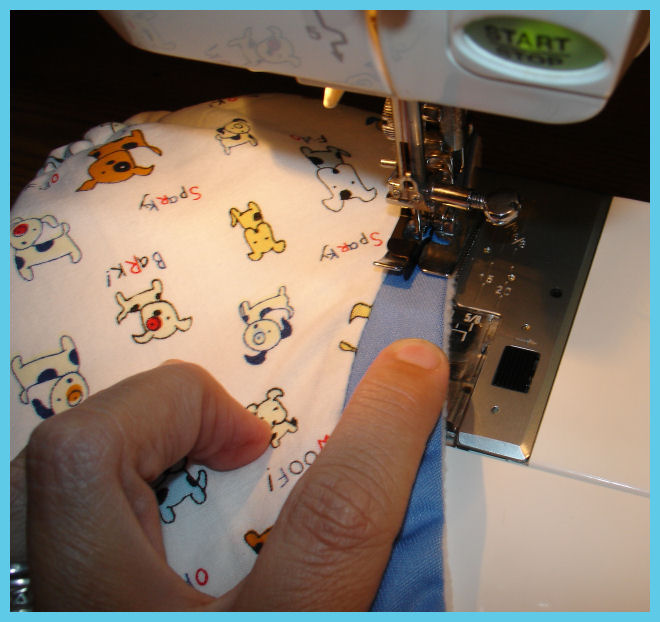
Now you will pin the PUL fabric side to right side of woven starting at the first mark. Don't worry about pinning it along the curve. If you sew slowly and stop with the needle in the down position you can manipulate the fabric and sew it together nice and evenly along the curve.


When you get to where the PUL starts to curve away from the woven sink your needle and gently adjust the fabric so the PUL and woven are lined back up again.

Be careful not to tug and really pull on the PUL. You want it to stay smooth and not pucker or pull.

One leg done, repeat with the other side.


Now that you have the leg curves redone in PUL it is time to add any rise snaps, tummy snaps or loop tape. Back the snaps and loop like you would for any regular diaper. I use scraps of PUL that won't show through the woven. On this one I used white PUL. Once you have that completed you will pin your layers together. I treat the inner and hidden PUL as one layer.
So for this diaper I laid my cotton woven right side up as pictured. On top of this I placed my inner layer right side down and the PUL shiny side down on top of that. Pin your layers together by pinning inside your seam allowance.
Trim the extra PUL from the legs so your pattern is all even.

Sew the diaper together. Remember to leave an opening along the tummy to turn right side out even if making a pocket. Since the PUL is hidden you will have no way to turn the diaper right side out if you sew it shut.
Sew the elastic in to your diaper in the seam allowance along the legs and back.

Clip the corners.
Push the corners out to make them nice and crisp.
Now it's time to top-stitch! I started top-stitching and forgot to take the pictures for the first leg curve so my pictures are for the opposite side.
I like to start along the tummy panel. I use a blind hem foot to do my top-stitching. If your machine has a needle down position select that. If not hand turn the needle to the down position when you get the corners. Now when you come to the first elastic mark on the diaper you want to angle the diaper in towards the 1/2 inch mark on your throat plate. You do not want to stitch on the cotton at all.
Stitching slowly even the fabric out with the 1/2 inch mark and continue to case the elastic normally. When you are coming up to the second elastic mark you will start to taper the stitching toward the edge again. Sink your needle and pivot on the elastic mark and stitch toward the edge of the fabric.


Thank you so much for this tutorial! I bought a bunch of UGLY PUL on sale and had made a few cotton outer diapers, but they wicked just enough to be annoying when we were out and about. This will be great to use as I finish using up that stash!
ReplyDeleteYou are very welcome! I had the little guy in this diaper for just about 3 hours the other day. Insert soaked...outer dry. Total win :)
DeleteKrista
So glad to see The Chelory Method of the PUL in the legs live on. It's such a great way to use cotton outers. Your tutorial on how to do it is great.
ReplyDeleteI used this method and my diaper wicked and it got wet any tips on what I can do
ReplyDeleteListen...
ReplyDeleteWhat I'm going to tell you might sound a little creepy, maybe even kind of "strange"
HOW would you like it if you could just push "PLAY" and LISTEN to a short, "miracle tone"...
And miraculously bring MORE MONEY into your life?
What I'm talking about is BIG MONEY, even MILLIONS of DOLLARS!
Sound too EASY? Think it couldn't possibly be REAL??
Well, Let me tell you the news...
Usually the most significant miracles life has to offer are also the SIMPLEST!
Honestly, I will PROVE it to you by allowing you to listen to a REAL "magical money-magnet tone" I've produced...
And TOTALLY FOR FREE
You just hit "PLAY" and watch how money starts piling up around you. starting so fast, you will be surprised.
CLICK here to experience the magical "Miracle Wealth Building Tone" - it's my gift to you!