The current coupon code that is valid in both stores (Etsy and Hyenacart) will expire at the end of this month. You can currently purchase any Rocket Bottoms pattern using the code FALL2011 and receive 50% off the price at check out.
I have a new pattern up! It is the sized version of my OS cover. I will hopefully be wrapping up the Side Snapper pattern this weekend and have it up by Monday.
I hope everyone had a great day yesterday if you celebrated Thanksgiving.
Happy diaper sewing!
♥Krista
Friday, November 25, 2011
Monday, November 21, 2011
Six short videos on welt pocket construction
I posted these on Facebook but have been asked for them again recently so I figured it would be a good idea to post them here too!
There are six of them only because my satellite internet was unable to upload the full video I originally made to YouTube. Boy do I miss my broadband internet but I really love living on the lake. The trade offs we make!
They are in order just click on down list to watch them all :)
http://www.youtube.com/watch?v=CQgo9SnJhKY
http://www.youtube.com/watch?v=RY0RClXsVJU
http://www.youtube.com/watch?v=WjQJ_NSXOXY
http://www.youtube.com/watch?v=1JIIv6J8qQM
http://www.youtube.com/watch?v=lajLgvyErBM
http://www.youtube.com/watch?v=QLCeEu4ZHs8
♥ Krista
Wednesday, September 14, 2011
How to embroider on a onesie or small shirt for a child
I know this isn't diaper pattern or diaper sewing related but if you sew diapers chances are you make other items or like to embellish clothing for your little one. I have been asked before how exactly do I embroider on a small onesie and get a great result. Today I had an opportunity to take pictures of the process while doing a favor for a friend.
I use this technique on all sizes of onesies and shirts from newborn to small child. The end goal is a stitch out that is smooth with no puckering, stretching or distorting in the fabric you are stitching on. Doing your small clothing items this way will have you achieving that great result time after time.
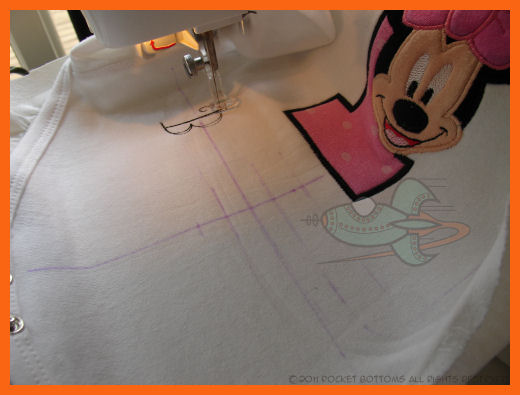
First thing I do is mark the center of the item, from collar to hem, I will be stitching on. If I am stitching something smack on the chest of the shirt I will determine my layout along that center line. I like to stay a couple of inches below the collar when possible as that makes hooping easier and the top of the shirt more stable. You can see in this picture that I shifted where I wanted the design to be so I could add in a second hooping for the lettering.

Now that the placement is marked let's pop that side seam! Grab your seam ripper and start picking apart the seam starting at where the binding along the bottom of the onesie is joined.

Being that this onesie is an 18/24 month onesie I decided to stop at where the sleeve joins the body of the onesie.

With the seam open it's time to prep the back of the onesie for hooping. I ♥ my Machine Embroidery spray. This is the only one I will use. It does not gum up my machine at all. Lightly spray the backside of the onesie and let it set per product directions for 10 minutes. This is important! When it sets up it dries a little and you are not stitching on wet sticky adhesive spray. It also makes the garment repositionable if you need to adjust anything.

When the spray has set up it is time to take your piece of cutaway and smooth it onto your garment.

It is now time to hoop up your garment. Uh oh....looks like I didn't open the seam up enough to keep the garment easily out of the way while stitching my design. If this happens to you grab the seam ripper and open the seam up to the end to give you a little more room. I don't like to have to hold a garment out of the way while stitching out a design.

Load your hoop onto your machine. You can use hair clips to gather up the excess material on the onesie if you like. It is not necessary. Just keep it to the side of the hoop and make sure it doesn't find it's way under the hoop.

As I am doing an applique design on this onesie I cut out all my fabric pieces in advance (not shown) and prepped them with the embroidery spray so when I needed them they would be ready. With the design loaded and hoop in place you are ready to go. The reason I use the machine embroidery spray is because I do not fussy cut my pieces. In my experience it is too easy to be off in your cutting and this can affect the outcome of your project. So I like to print off a full scale printout of the design from my software and use that to get measurements for my blocks. Cut the blocks out, prep them and set them aside until I need them.
Here I have smoothed down my first fabric block in my design.

When each block finishes remove your hoop from the machine but do not unhoop your project! Carefully trim the excess fabric from the block. Trim close to the stitching but take care not to clip stitches. When finished trimming, load hoop back up and go to next step.
For this design once all my fabric pieces have been stitched and trimmed it's time for detail stitching. As all my blocks were prepped they laid nice and flat and stayed put while being stitched down.

When the design is finished remove the hoop from the machine and trim all the jumps on the backside. I like to keep the back just as clean looking as the front.

For this project I need to hoop my garment a second time. This will be easy to do since I already made my placement lines. With the fabric being prepped already there is no need to spray it again to get it ready. Just hoop a piece of cutaway stabilizer in the hoop.

Smooth the garment down onto the stabilizer, taking care to line up your placement marks with the guide marks on the hoop's inner ring.

Load the hoop, start up the design and stitch it out!

When you are all done, remove the hoop from the machine and pop it off your garment. Now trim up the jumps if any and trim your stabilizer.

It is now time to sew that seam back up. Pin the onesie/shirt closed and stitch it back together following the original stitching line. Finish the edge either with your serger or use an overlock stitch on your sewing machine.
Your garment is now ready to be rinsed off and dried so that you can iron on protective mesh covering. I like to cut my cover mesh to be about 1/2 an inch to 3/4 of an inch bigger than my design so I know all the stitches will be covered and there is nothing but softness touching baby's skin.

I use this technique on all sizes of onesies and shirts from newborn to small child. The end goal is a stitch out that is smooth with no puckering, stretching or distorting in the fabric you are stitching on. Doing your small clothing items this way will have you achieving that great result time after time.
First thing I do is mark the center of the item, from collar to hem, I will be stitching on. If I am stitching something smack on the chest of the shirt I will determine my layout along that center line. I like to stay a couple of inches below the collar when possible as that makes hooping easier and the top of the shirt more stable. You can see in this picture that I shifted where I wanted the design to be so I could add in a second hooping for the lettering.

Now that the placement is marked let's pop that side seam! Grab your seam ripper and start picking apart the seam starting at where the binding along the bottom of the onesie is joined.

Being that this onesie is an 18/24 month onesie I decided to stop at where the sleeve joins the body of the onesie.

With the seam open it's time to prep the back of the onesie for hooping. I ♥ my Machine Embroidery spray. This is the only one I will use. It does not gum up my machine at all. Lightly spray the backside of the onesie and let it set per product directions for 10 minutes. This is important! When it sets up it dries a little and you are not stitching on wet sticky adhesive spray. It also makes the garment repositionable if you need to adjust anything.

When the spray has set up it is time to take your piece of cutaway and smooth it onto your garment.

It is now time to hoop up your garment. Uh oh....looks like I didn't open the seam up enough to keep the garment easily out of the way while stitching my design. If this happens to you grab the seam ripper and open the seam up to the end to give you a little more room. I don't like to have to hold a garment out of the way while stitching out a design.

Load your hoop onto your machine. You can use hair clips to gather up the excess material on the onesie if you like. It is not necessary. Just keep it to the side of the hoop and make sure it doesn't find it's way under the hoop.

As I am doing an applique design on this onesie I cut out all my fabric pieces in advance (not shown) and prepped them with the embroidery spray so when I needed them they would be ready. With the design loaded and hoop in place you are ready to go. The reason I use the machine embroidery spray is because I do not fussy cut my pieces. In my experience it is too easy to be off in your cutting and this can affect the outcome of your project. So I like to print off a full scale printout of the design from my software and use that to get measurements for my blocks. Cut the blocks out, prep them and set them aside until I need them.
Here I have smoothed down my first fabric block in my design.

When each block finishes remove your hoop from the machine but do not unhoop your project! Carefully trim the excess fabric from the block. Trim close to the stitching but take care not to clip stitches. When finished trimming, load hoop back up and go to next step.
For this design once all my fabric pieces have been stitched and trimmed it's time for detail stitching. As all my blocks were prepped they laid nice and flat and stayed put while being stitched down.

When the design is finished remove the hoop from the machine and trim all the jumps on the backside. I like to keep the back just as clean looking as the front.

For this project I need to hoop my garment a second time. This will be easy to do since I already made my placement lines. With the fabric being prepped already there is no need to spray it again to get it ready. Just hoop a piece of cutaway stabilizer in the hoop.

Smooth the garment down onto the stabilizer, taking care to line up your placement marks with the guide marks on the hoop's inner ring.

Load the hoop, start up the design and stitch it out!
When you are all done, remove the hoop from the machine and pop it off your garment. Now trim up the jumps if any and trim your stabilizer.

It is now time to sew that seam back up. Pin the onesie/shirt closed and stitch it back together following the original stitching line. Finish the edge either with your serger or use an overlock stitch on your sewing machine.
Your garment is now ready to be rinsed off and dried so that you can iron on protective mesh covering. I like to cut my cover mesh to be about 1/2 an inch to 3/4 of an inch bigger than my design so I know all the stitches will be covered and there is nothing but softness touching baby's skin.

All done!
♥Krista
Sunday, September 11, 2011
How I back and seal my embroidery for diapers on PUL
Adding embroidery to your diapers can turn an ordinary diaper into something extraordinary! The question I get a lot is how to do it so it doesn't wick. This is easy!! Here is a quick tutorial for how I embellish diapers with embroidery. In the 4 1/2 years that I have been doing it this way, not a single diaper has ever leaked through my embroidery.


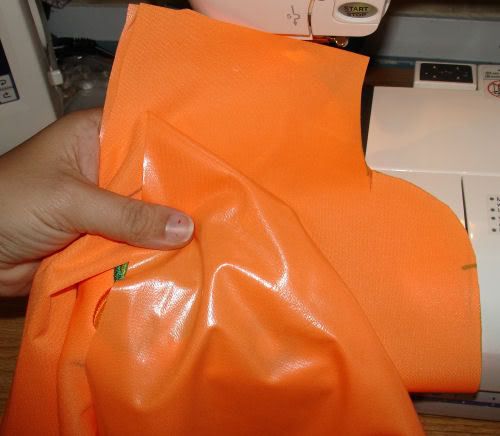
I don't have pictures of the first few steps but they are easy :) First you want to trace out your pattern piece onto your PUL. Don't cut it out! You want to make sure you have plenty of material to hoop so wait to cut your diaper out until after you embroider.
You will want to find the center of the diaper. Fold the diaper cut in half length wise, mark the center. Draw a line across the back of the diaper between the back leg elastic points. Extend your center mark down the diaper so you get a crosshair. This is where you want your embroidery to be centered. Most of the time I will draw a box that is slightly larger than the size of the design I am embroidering as it helps get it lined up in the hoop when I use a home machine.
The following pictures were made using a commercial embroidery machine but the process is still the same if you use a home machine.
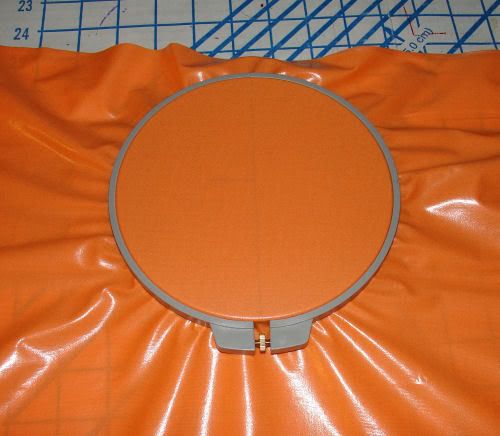
Here I have hooped just the diaper cut. You do not have to hoop your scrap PUL piece and stabilizer. These can be floated under the hoop.
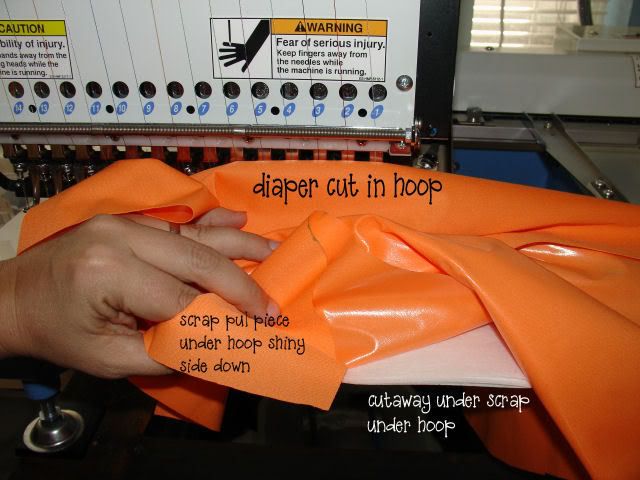
When you load your hoop onto your machine you will place your scrap piece of PUL under the hoop, shiny side down and your cutaway stabilizer under that.
When you are finished stitching the design, remove the hoop from the machine and trim your stabilizer close to the design. When you are finished with that it should look something like this.
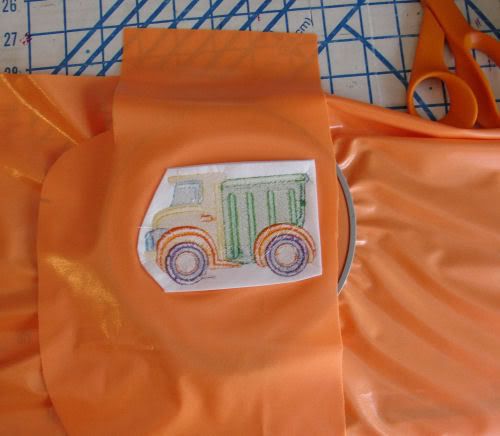
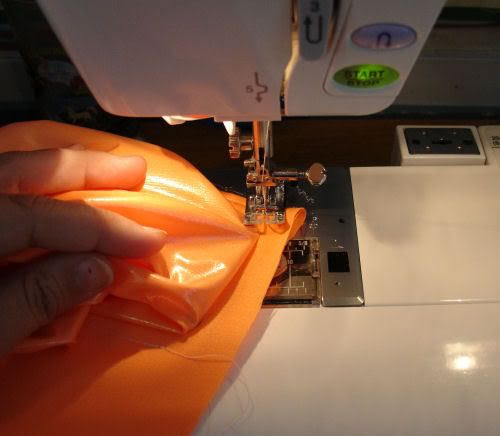
Now you will fold your scrap piece of PUL up and over the back side of the embroidery to cover it.
Now you will sew around the embroidery design on the scrap piece of PUL to encase it. Fold your diaper cut out of the way, you don't want to sew that to your scrap.
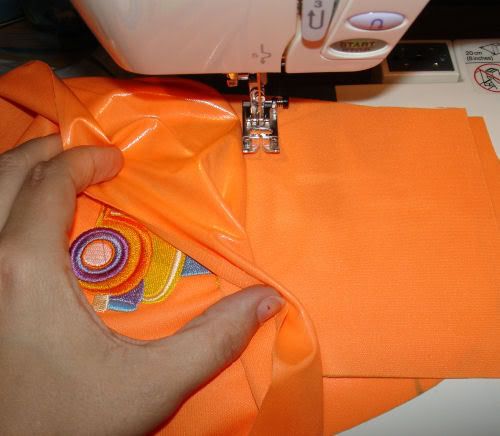
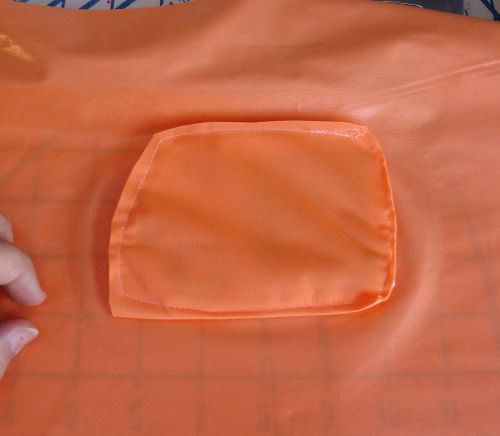
When finished you will have something that looks like this picture.

Trim around the encased design to remove excess scrap PUL. Your embroidery is now totally encased. When you toss the diaper into the dryer after sewing it up the heat will seal the holes in the PUL covering the embroidery and it will prevent wetness from coming through your design.
Sew the diaper up following the construction instructions on the pattern you are using and you are all set!
♥ Krista
How to easily sew blind elastic in a serged diaper
This week I am testing out a few revisions I have made to the OS Fitted pattern and so here is how I sew in my blind elastic when I am making a serged fitted diaper.
First you want to get your fabric layered how you want it to be in the diaper. I like to have my inner layer on the bottom of the stack right side facing down followed by the hidden layer, also right side facing down. Then I top it with my outer layer facing right side up. Lay your pattern down and trace it out and transfer all marks. When you go to cut it out do not cut it out on the line, cut around the line. I add my soaker snaps now.

I usually start at the back elastic point on my right of the diaper. Set your needle to the far left position and stitch a basting line from one point to the other. Do not lock your stitches! You want to be able to pull out the basting stitch line when you are finished.

Your guide line will end up being almost a half of an inch away from the cut line on the diaper. Do this for the other leg and then the back.

All elastic placement guide lines stitched out.

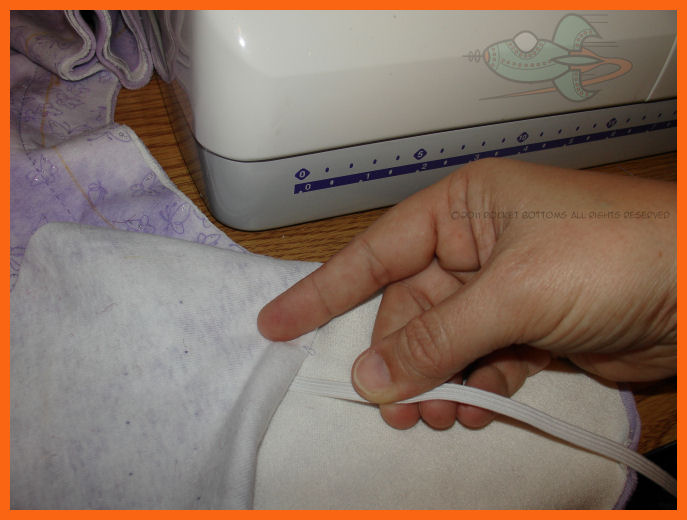
Now it is time to thread your elastic between the layers.

Make sure to leave a tail of elastic that extends past the elastic mark point. Now you are ready to sew the elastic in.

I use a wide three step 3 zigzag when I sew in my elastic. Tack the elastic in securely then sew with your needle so it stops in the down position and firmly pull your elastic against your guide line. Line your presser foot up with the guide line and stitch down your elastic.

Do this for all elastic areas, when you are finished it will look like this.

Remove your basting stitches and serge the diaper up. You have even perfectly placed elastic and you will get this result each and every time you sew in your elastic like this.

This diaper has slightly ruffled legs. To have a less ruffled look have your guide line closer to the cut line. Make sure that you do keep at least 1/4 of an inch distance from the cut line and your guide line so you don't serge into your elastic. For a more ruffled leg sew the guide line slightly further into the diaper.
Diaper on smallest rise setting.

Inside of diaper showing nice evenly placed elastic. Ignore the fact that I need to toss this diaper in the wash to remove my marker marks.

Diaper on largest rise setting.

First you want to get your fabric layered how you want it to be in the diaper. I like to have my inner layer on the bottom of the stack right side facing down followed by the hidden layer, also right side facing down. Then I top it with my outer layer facing right side up. Lay your pattern down and trace it out and transfer all marks. When you go to cut it out do not cut it out on the line, cut around the line. I add my soaker snaps now.

I usually start at the back elastic point on my right of the diaper. Set your needle to the far left position and stitch a basting line from one point to the other. Do not lock your stitches! You want to be able to pull out the basting stitch line when you are finished.

Your guide line will end up being almost a half of an inch away from the cut line on the diaper. Do this for the other leg and then the back.

All elastic placement guide lines stitched out.

Now it is time to thread your elastic between the layers.
Make sure to leave a tail of elastic that extends past the elastic mark point. Now you are ready to sew the elastic in.

I use a wide three step 3 zigzag when I sew in my elastic. Tack the elastic in securely then sew with your needle so it stops in the down position and firmly pull your elastic against your guide line. Line your presser foot up with the guide line and stitch down your elastic.

Do this for all elastic areas, when you are finished it will look like this.

Remove your basting stitches and serge the diaper up. You have even perfectly placed elastic and you will get this result each and every time you sew in your elastic like this.

This diaper has slightly ruffled legs. To have a less ruffled look have your guide line closer to the cut line. Make sure that you do keep at least 1/4 of an inch distance from the cut line and your guide line so you don't serge into your elastic. For a more ruffled leg sew the guide line slightly further into the diaper.
Diaper on smallest rise setting.

Inside of diaper showing nice evenly placed elastic. Ignore the fact that I need to toss this diaper in the wash to remove my marker marks.

Diaper on largest rise setting.

♥ Krista
Tuesday, August 30, 2011
How to seam your FOE for a professional finish
If you are like me then perhaps you simply folded the FOE tail end over towards the inside of the diaper and sewed that down. I did all my FOE finishing like this for years and just really hated the way it looked but was not sure exactly how I wanted to finish it off to make it look better. I mean function wise it works just great, not to mention it is easy and quick to do like that. Look wise, not so professional. So I set out to get this process down pat and done the easiest way I could.
If you are wanting to sell covers or diapers bound with FOE and do not seam your FOE yet, then this simple tutorial is for you!
Take a moment to look at the pattern you are using and determine where the best place to end your FOE is going to be. If it is a front closing diaper/cover without front elastic then the tummy panel is the best place. Otherwise on one of the back wings at least 3/4 of an inch prior to the back elastic mark on the left of the diaper (when the diaper is right side of the outer layer facing up) is best.
For this tutorial I am making a cover that has a flat front tummy and closes in the front so this is where I am going to seam my FOE. I mark on the fabric where I want to start sewing the FOE down. I want an inch and a half between my start and stop point so my seam will fall dead center between my start and stop at 3/4 of an inch.

Leave yourself a tail of FOE here at least 1 1/2 to 2 inches long. I like to make a mark on the FOE that corresponds to the mark I made on the fabric.

Here I have marked 3/4 of an inch in from the edge. This is the line you will sew on once you have FOE'd your diaper/cover. I also mark 3/4 of an inch over to the right from that to match my start point.

I'm a little OCD and like to mark that start point again on the top of my FOE.

Get your FOE lined up with the diaper/cover at your start mark. Set your machine so that when it stops the needle rests in the down position. Also, my preference is to sew FOE down with a wide 3 step zigzag but you can absolutely use a straight stitch here. Just stitch slowly and keep the line of stitching 1/8th of an inch from the left edge of the FOE as you sew it to your diaper/cover.

I like to have my presser foot lined up at the first little line on the left side of the foot. This places my stitching close to the left edge of the FOE and helps to keep the FOE from rolling up a little after washing.

Any time you need to stop and make adjustments to the FOE I find it is best to stop with your needle down in either the far left or far right position. This will help you maintain nice and even spacing with your stitch when using a wide 3 step zigzag and give your finished product a more polished look.

When I am getting close (like an inch away) to my stopping point I like to stop sewing and smooth the FOE around the edge of the diaper so I can mark on the FOE where I will sew the ends of the FOE together. So for this cover that is 3/4 of an inch away from my stop line. Little change up here, pictures from another cover only because I have more detailed images on this one than the one I made for the pattern instructions.

After you get to your stop point, lock your stitched and remove your cover from your machine. Now you will turn the FOE so that the RIGHT SIDES touch and match up your lines you made on the FOE. This is your seam sewing line.

I like to run a pin through the line to hold the FOE right where I want it and then pull it out as I start to sew the FOE together. Be sure to lock your stitches at the start and end of stitching on this line.

Trim close to your stitching, like 1/4 of an inch away, angle in your corners. Clip threads.

Open the seam and turn the FOE so the right side is facing up and the wrong side down.

Smooth the FOE down onto the diaper/cover and you are ready to sew the last part.

Put the cover/diaper back on the machine and line it up to where you start stitching at the stop line. Sew across the FOE to the original start line to finish this up. Lock stitches, remove from machine, clip threads and you are done!!

Now you have a diaper/cover that is bound in FOE and looks polished and professional!
♥ Krista
Monday, August 29, 2011
Adding sidewall gussets to any diaper or cover pattern, an easy how-to tutorial!
It is really easy to add gussets to ANY diaper or cover pattern that you have in your stash. There are no fancy pattern pieces needed. I am using pictures from my new cover pattern and these were taken while making an In A Snap Tuck-It-In style cover.
First you are going to take your ruler and measure from one elastic point on your pattern to the other. Whatever that measurement is, add one inch. Draw this on your scrap PUL or whatever fabric you are using for your gusset. Find the center of this line and measure down 2 1/2 inches. This determines the overall center height of your gusset. I like 2 1/2 inches because once I have sewn the FOE on around the diaper my gusset is about 2 inches tall and that's perfect to me. Now if you don't like FOE or your little one has allergies or sensitivities you can totally do this with a turned version of any diaper or cover pattern but I will get to that at the very end.
Now you will use a french curve, bowl or plate to make a curve that starts at one end, meets the measurement for height then goes to the other end. You want to end up with a piece that looks like my paper piece in this picture.


Now that your gussets are prepped you are ready to pin them to your cover layer. Mark the center of each gusset and find the center between the leg elastic points and mark that. Line up your centers and pin then pin at each end. You will want to rotate the end of the gusset just a little so it tapers off the diaper here. If you can see I have the gusset elastic mark lined up with the cover layer but it is turned a bit. Pin down, do this on the other side.

Now you have three pins in place and can ease the gusset and diaper layer together and pin in a few more places.

Here is my gusset piece all pinned in. You really don't need a lot of pins for this step.


First you are going to take your ruler and measure from one elastic point on your pattern to the other. Whatever that measurement is, add one inch. Draw this on your scrap PUL or whatever fabric you are using for your gusset. Find the center of this line and measure down 2 1/2 inches. This determines the overall center height of your gusset. I like 2 1/2 inches because once I have sewn the FOE on around the diaper my gusset is about 2 inches tall and that's perfect to me. Now if you don't like FOE or your little one has allergies or sensitivities you can totally do this with a turned version of any diaper or cover pattern but I will get to that at the very end.
Now you will use a french curve, bowl or plate to make a curve that starts at one end, meets the measurement for height then goes to the other end. You want to end up with a piece that looks like my paper piece in this picture.

Now once you have your template or shape drawn on your fabric you will mark in 1/2 of an inch from each end, these are your elastic points for the FOE along the top of the gusset to gather it nicely. Cut out two gusset pieces. The stretch of the fabric should be going side to side and not up and down.
I like to use 3/4 inch FOE on gusset tops but you can use 5/8, 7/8 and 1 inch FOE. Now you take your FOE and fold one end in half and slip your gusset piece into it. You will want to leave about 1-2 inches of FOE for a tail so you have something to grab onto when you sew the FOE down.

Starting at the end of the gusset piece tack down your stitches and sew to your elastic mark. Stop with your needle in the down position and pull the FOE firmly, stretching it down the length of the gusset piece.

Hold securely and sew slowly using a wide 3 step zigzag stitch. When you reach the elastic end point stop stretching the FOE and continue sewing the last half inch, tack stitches and repeat with the other side.


Now that your gussets are prepped you are ready to pin them to your cover layer. Mark the center of each gusset and find the center between the leg elastic points and mark that. Line up your centers and pin then pin at each end. You will want to rotate the end of the gusset just a little so it tapers off the diaper here. If you can see I have the gusset elastic mark lined up with the cover layer but it is turned a bit. Pin down, do this on the other side.

Now you have three pins in place and can ease the gusset and diaper layer together and pin in a few more places.

Here is my gusset piece all pinned in. You really don't need a lot of pins for this step.

When you go to sew your gusset and cover layer together, this is important, have your gusset layer facing DOWN. Use the feed dogs to do all the work and ease the two layers together. All you do is guide the fabric and the machine does all the work here. Sew close to the edge, I like to sew about 1/8th of an inch from the edge for this step.


See how nice that looks? No tucks or wrinkles or anything. Perfectly eased in gusset to your cover layer.
Do that to each leg and trim the tails of FOE off that are sticking out and you are all ready to bind your cover in FOE! Now wasn't that easy? :)
If you are making a turned diaper or cover you will sew your gusset piece to the inner layer. Wrong side of gusset to right side of inner layer. All other construction steps remain the same. Sew your elastic into the seam allowance on either your inner or outer layer. When you turn your diaper or cover right side out your gussets will be facing the right way and once you case the leg elastic they will stand up nicely in the leg curve.
I hope that this helps out anyone that is struggling with how to add gussets to any pattern! Please feel free to link to this blog post but do not copy my photos without my permission. Thank you!
Krista
Subscribe to:
Posts (Atom)